TOP 5 Heat Sinks TOP 5 Low Profile Heat Sinks TOP 5 Liquid Coolers
Heatsinks by Brand / Mfgr Reviews + Articless Advanced Search
|
TOP 5 Heat Sinks TOP 5 Low Profile Heat Sinks TOP 5 Liquid Coolers Heatsinks by Brand / Mfgr Reviews + Articless Advanced Search |
Update to: "How to make a Thermistor out of a Laptop Battery" We've had some great responses to the "How to make a thermistor
out of a laptop battery". It seems there is great interest in the
topic, so lets' look at a couple of points in a little more detail. I've
had a few questions about some things so hopefully this update will clear up
any fuzzy points in 'how to make a thermistor out of a laptop battery'.
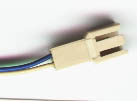
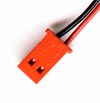
1) How are multiple probes connected to the sensor? A picture of the orange connector was shown in the original article, but I can see how this point was open to a bit of confusion. The femal connector on the left was attached to the sensor display. Various male connectors were "hooked up to the sensor when we need a reading." At the moment, what that means is if there are four thermistors within the computer, each one must be sequencially hooked up to the display sensor to determine the temperature of that particular thermistor. It's the best possible solution we could come up at the time - hooking up a little connector is a lot easier then moving the requisate thermistor all around, and possibly contaminating temperature results during a test for example. The
focus of the article was assembling the actual thermistor probe, however we are currently working on a multi-point thermistor rig that would allow several probes to be
hooked up to one sensor, and enable rapid indexing. I'll be posting an article about that when its complete. Keep an eye out
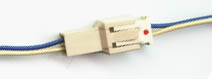
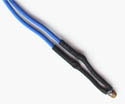
for it, its not too far away... 2) How do you insulate the thermistor? As stated in the article; "Soldering lead wires to the thermistor, with a bit of heat shrink tubing (4' - 1/8" dia. ~$0.50) or tape to insulate the soldered joints, is about all that needs to be done."Heatshrink tubing is slid over the wires before they are soldered, and then positioned over the exposed metal after soldering is complete. Heating of the tubing material (hair drier / lighter) causes it to decrease in diameter, encasing the wire and thus insulating from possible shorts. In the image below you can see a finished thermistor after the leads have been insulated. This can also be accomplished easily with electrical tape as well. Bare leads in close proximity to a processor could be a recipe for disaster if they happen to short out a component.
Well, there are a couple of reasons. From our position in
Canada, ordering thermistors from the source we quoted it just too
expensive for more then one or two. The least expensive
ones are $6 US @ 1.56 exchange is about $9.36ea. not including shipping,
taxes or minimum order restrictions. We currently have six thermistors salvaged from various equipment in use. That translates into
$56.16 we didn't have to fork out. We paid $6 US for the laptop battery in
the test and got two thermistors for it. $3 a piece is a
pretty good deal for thermistors. Also, some people may be fortunate
to have an old laptop battery lying around doing nothing, or know where some are being
sold off for a few dollars each, and could
potentially use them. Lastly, Recycling - its good for the envirnoment too! There wouldn't be much point in getting a digital multimeter just to test thermistors. If one is available, its a great way to test thermistor compatibility. If a multimeter isn't readily available there were a couple other ways we pointed out to test compatibility. As an aside, the point of the article is not really about what is affordable,
it was intended to show an alternative to commercial avenues for getting
thermistors. There are many articles out there which will tell you the exact
part numbers to buy from Radio Shack in order to make your thermistor. www.bxboards.com has a really good write up if anyone doesn't feel like tackling this kinna thing.
|
|
|||||||||||||||||||||||||
|
Find a Heatsink . Latest Heatsink Reviews . Top 5 Heatsinks Tested . Top 5 Low Profile Heatsinks . Top 5 Liquid Coolers . Heatsinks by Mfgr / Brand |
Social Media |
FrostyTech.com Info . Feedback . Contact Us / Heatsink Submissions . Submit News . Privacy Policy |
 | |
© Copyright 1999-2025 www.frostytech.com All Rights Reserved. Privacy policy and Terms of Use Images © FrostyTech.com and may not be reproduced without express written permission. Current students and faculty of accredited Universities may use Frostytech images in research papers and thesis, provided each image is attributed. | ||||