TOP 5 Heat Sinks TOP 5 Low Profile Heat Sinks TOP 5 Liquid Coolers
Heatsinks by Brand / Mfgr Reviews + Articless Advanced Search
|
TOP 5 Heat Sinks TOP 5 Low Profile Heat Sinks TOP 5 Liquid Coolers Heatsinks by Brand / Mfgr Reviews + Articless Advanced Search |
Stage 3 - Putting it all together
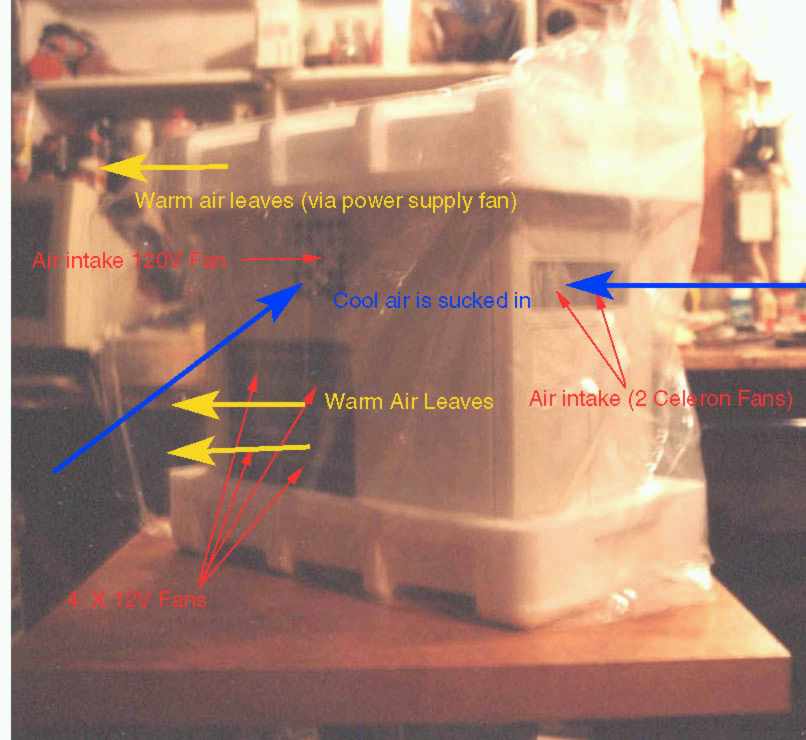
Finishing Touches 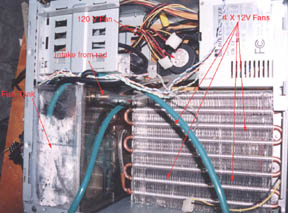 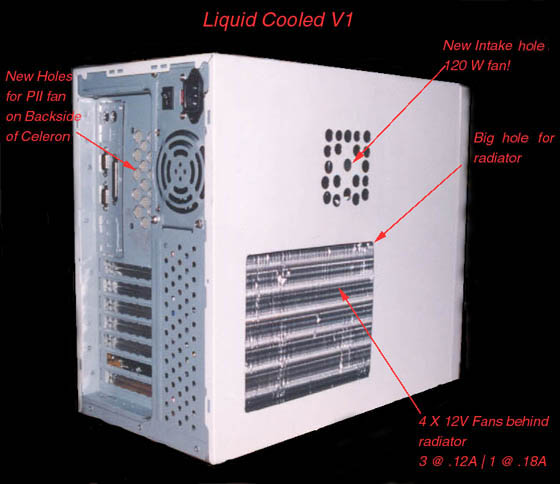 With all the modification done on the case the project was just about done. We had to make the water tank to fit perfectly in between the radiator and the front of the case. It also had to be close to the 5/1/4 bays to maximize the amount of water it could hold. The water tank is see through so from the front of the case you can see what's going on inside. We were going to put some fish in it but the pump is very powerful and we were pretty sure they would die really quickly! Next we had to put attach all the components together. This required us to make some adapters. The radiator unit has output is a piece of copper tubing that is a little too small. We soldered a piece of the copper piping we had and it fits perfectly onto the green plastic tubing. We could have just used some sort of clamp - but we wanted things to be as naturally tight as they could be - less things to worry about coming off with use and water pressure. We then made the attachments to the CPU unit. We did use clamps in addition to a perfect fit (perfect fit means we had to heat the pipe over a flame and quickly attach it to the CPU unit). It was done and yes the case FIT on. This is where the five days ended. It actually took about 72 hours strait to build this computer. That is with two people working strait - we did it over 5 days. It was I did a very short version of how much work was involved in this project. The system is perfect though. There is NO room to spare and everything fits in the case. TO put things in the case you have to go in a certain order so that it all fits.
What is in the beast: CPU: Celeron 300A Slot 1 Ram: 32MB PC 100 - I could not get any 8NS or less ram at the time. It is hard to find in Canada. Good/Fast ram is hard to find from large distributors. Hard drive: 1.2 GB Matrox. Video: 512K Trident PCI As you can tell I was using the cheapest stuff I could find. This system is only for fun and cracking - All I relay wanted was speed and to see if I could actually build a self contained water-cooled system. So everything fit it and it was time to turn it on! It booted up and yes it did not explode. For the next little bit I played with the BIOS and the CPU settings. To my disappointment this Celeron needed a kick to get it to 450 - 2.2V to be exact. I did not burn the system in so I was not totally disappointed. The system did the 468 thing but no 504. I was not surprised - I am sure it is the system memory this is the problem -112Mhz is a big whatever with most 10ns ram. I knew that the celeron seems to like getting "burned in" before it will do the 504 tango. My goal was not to build the Overclockers dream system. I new when making the system water-cooled all internal, it would not allow the water to stay supper cool. My goal was to build something that has not been built before and it was great. Next few weeks Big problem found when I came home one day took a look at the water-cooled system. I had been really busy with school and work and had not even turned on the system for another week. I looked at the water tank to see how it was doing and to my surprise (shock) it was empty! I thought for a sec that it had all evaporated. The top is removable but tight and there is only a small hole for the out pipe to go so it seemed highly unlikely that it had evaporated. I put my hand down on the carpet and found that it was WET. It turned out that when we built the second water tank (we dropped the first) we made it in too much of a hurry. There was a small leak on the bottom of it. Nothing happened to the motherboard since it is raised, but it meant I had to take the system apart and fix the hole. I decided to take a lot of the silicone off the case and replace it with epoxy! It is so much stronger and I did not want anymore problems. Second test Well this is the second test! A wrote this whole article on the water-cooled system! I installed a cheep 4X CD-ROM so that I could load my modem drives on and get the system on the net. There is still no 3/1/2 - and I am keeping it that way! I tried to hit the 504 - but no luck yet. I saw an article today that suggested putting the voltage up to 2.6 before the system would do the 504! I am first going to let the system run for a week or so before I try that. This is the first time I have let it run for more than an hour, so it still needs to be worked in.
|
|
|||||||||||||||||||||||||
|
Find a Heatsink . Latest Heatsink Reviews . Top 5 Heatsinks Tested . Top 5 Low Profile Heatsinks . Top 5 Liquid Coolers . Heatsinks by Mfgr / Brand |
Social Media |
FrostyTech.com Info . Feedback . Contact Us / Heatsink Submissions . Submit News . Privacy Policy |
 | |
© Copyright 1999-2023 www.frostytech.com All Rights Reserved. Privacy policy and Terms of Use Images © FrostyTech.com and may not be reproduced without express written permission. Current students and faculty of accredited Universities may use Frostytech images in research papers and thesis, provided each image is attributed. | ||||