FrostyTech.com Heatsink Reviews and Analysis


TOP 5 Heat Sinks     TOP 5 Low Profile Heat Sinks     TOP 5 Liquid Coolers    
 Heatsinks by Brand / Mfgr      Reviews + Articless     Advanced Search    

Installing a Home Ethernet
  0%   
Abstract: So you have an ethernet and the wires are all over the place - what can be done to fix that mess?
Get a drill and get ready to make some holes in the walls!


 Manufacturer  Category  Published  Author 
FrostyTech   Networking   Mar 10, 2000   Max Page  

Home > Reviews > Page: Running wire on the outside

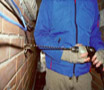
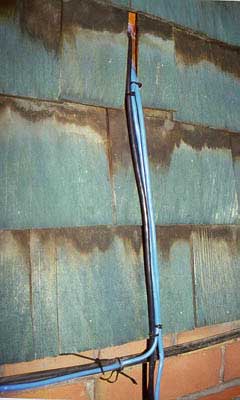
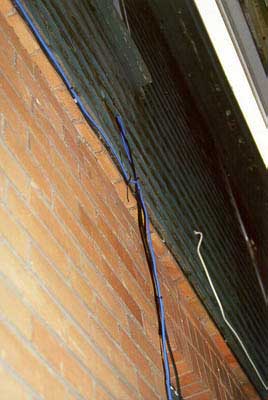
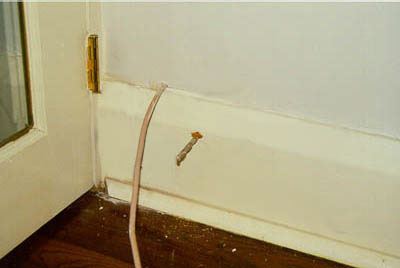
In our particular test location, residential houses are spaced about two feet apart. As cable and extra phone outlets have been installed over time, the technicians have been running the wiring along the outside of the house. As houses are so close together, visibility of wires is not an issue. Keep in mind this method may not be the best for houses with a lot of open space around them. I found one site that warned against running wires on the outside of a building as there was a potential to attract lightning. 

Before I go on I'm going to recap why no one should attempt to drill through walls unless completely knowledgeable about what can lie behind them. Most importantly that being electrical wires. Drilling anywhere near a plug can be very hazardous - especially if the drill bit were to hit a wire. Water pipes, drilling a wet wall, or by (or even below) a kitchen or bath poses the possibility of hitting a copper or PVC pipe and puncturing it.

The first hole:

Making sure our first drilling location was far away from any potential hazards, we decided to play it even safer and stuck close to an existing phone cable.

The first hole we needed to make was to fed all of the Cat5 cables through to the hub. We were able to use a standard 1/2" bit because the wood wall was only 6" thick.

In this case we chose to use the existing hole the phone company had made to bring service to the room and just enlarge it. We disconnected the telephone jack, undid all the wires, and pulled the telephone wire out of the hole from the outside. Using a standard 1/2" bit the hole was enlarged. 

Once complete, we fed the phone wire back through. A coat hanger with a bent end was fashioned to pull the wire. With the telephone wire connected back up the jack on the inside, the coat hanger was pushed through the hole from the outside. With the spool of Cat5 on the inside of the room, and end of the wire was looped around the bent part of the coathanger and pulled through to the outside.

With a length of wire still dangling from the wall, and uncut from the spool on the inside we set out to drill the hole in the adjacent rooms' outer wall to feed it back through.

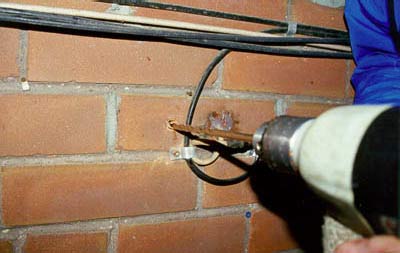
For the next hole we drilled 2" away (horizontally) from another existing phone line. If the drill bit is long enough, this is just a matter of drilling completely through the wall, if it isn't, and the wall thickness is less then twice the length of the drill bit then one can drill from opposite sides. This section of wall was about 8" thick so we careful measured exactly 2" (horizontally) from where the phone line came through on the inside, and marked the spot. We drilled through that point on the inside and met up with the hole we had drilled from the outside almost exactly.

Going back to the length of Cat5 now dangling out of the previous hole, we pulled it over to the new spot. The coathanger was again fed through from the inside, and the wire looped around the bent bit that stuck out. The coat hanger pulled from the inside to bring the wire back into the house. With the end of the wire in the room, we left a health length of extra wire (four feet worth) and set about with the next stage.

The Ethernet wire on this first run was attached to some existing phone cable line with wire ties (right) every 16". In the photo on the left this first wire skirts the brick where it meets the wood siding.

Leaving an extra length of wire on the hub-side, this first length of wire was cut from the spool and the next run of Cat5 started. Again the improvised wire puller (the coathanger) was fed from the outside while the wire was attached on the inside and pulled through the wall. This second length of wire was brought down to the next floor and then over a bit to where the next hole was going to be drilled.


Drilling through brick with a 16" masonry bit.


The end of our bit as it pokes through to the other side of the wall.

This next hole was a little bit more difficult to drill then the first two had been. At this location we were drilling through brick, so a masonry bit was required. This brick wall was really thick! Thankfully the 16" long 5/8" masonry bit we had was able to make it all the way through (with 2" to spare).

 Again, we sought out an existing hole and used it as a guide for safe conduct. In this instance we drilled an inch or so adjacent to a TV cable. By the second photo it is easy see we didn't drill perfectly level. The hole on the other side was bit low, the error magnified by the long drilling distance.

The wire was easily fed through the hole without the coathanger. An excess of wire on each end was left before we cut this line of Ethernet cable from the spool completely.

 Previous Page ° ° Next Page 

Table of Contents:

 1:  Installing a Home Ethernet
 2: — Running wire on the outside
 3:  Attaching the wire
 4:  Tools and Conclusions

List all FrostyTech heat sinks that Frostytech tested?

Facebook RSS Feed Twitter
Resources
° Got Feedback?
° Mk.II Test Platform
° Where To Buy?
° Manufacturer Index
° Industry Dir.
° Cooling Projects
Recently Tested

Scythe Mugen 5 Rev B SCMG-5100 Heatsink Review

Gelid Tranquillo 4 Air Cooled Heatsink Review

Coolermaster Ergostand III Laptop Cooling Stand Review

Noctua NH-D9DXi4-3U LGA2011 Xeon Server/Workstation Heatsink Review

Noctua NH-L9x65 Low Profile Heatsink Review

Scythe Fuma SCFM-1000 Heatsink
...More Articles >>


Websites you may also like:
PCSTATS


FrostyTech.com
Since June 1999


Find a Heatsink
Latest Heatsink Reviews
Top 5 Heatsinks Tested
Top 5 Low Profile Heatsinks
Top 5 Liquid Coolers
Heatsinks by Mfgr / Brand


Social Media
Facebook
Twitter
Pinterest


FrostyTech.com Info
Feedback
Contact Us / Heatsink Submissions
Submit News
Privacy Policy
Suite 66

© Copyright 1999-2023 www.frostytech.com All Rights Reserved. Privacy policy and Terms of Use
Images © FrostyTech.com and may not be reproduced without express written permission. Current students and faculty of accredited Universities may use Frostytech images in research papers and thesis, provided each image is attributed.